In June of 2016, we purchased a 2011 Nissan GT-R Premium with about 34,000 miles on it for a shop car. That might sound like a perfectly fine score by that description alone, but let’s just say this car had a… colorful last few years of ownership.


Clearly, it was totalled. But the damage looked repairable, the mileage was low, and the price was right. So about a week later, a trailer showed up and dropped off our new basket case.


It actually did move under its own power, but just. The shifter wouldn’t go back into Park, the transmission was bucking and kicking, it would barely move and hated every second of it. So we threw it on the lift and removed some of the rusty panels and wood screws that were holding the thing together!
It was also around this time that we set a goal in mind for this car: we wanted to bring it to the SEMA Show in November of 2017. So we started putting plans together for exactly what we wanted to bring to the show.

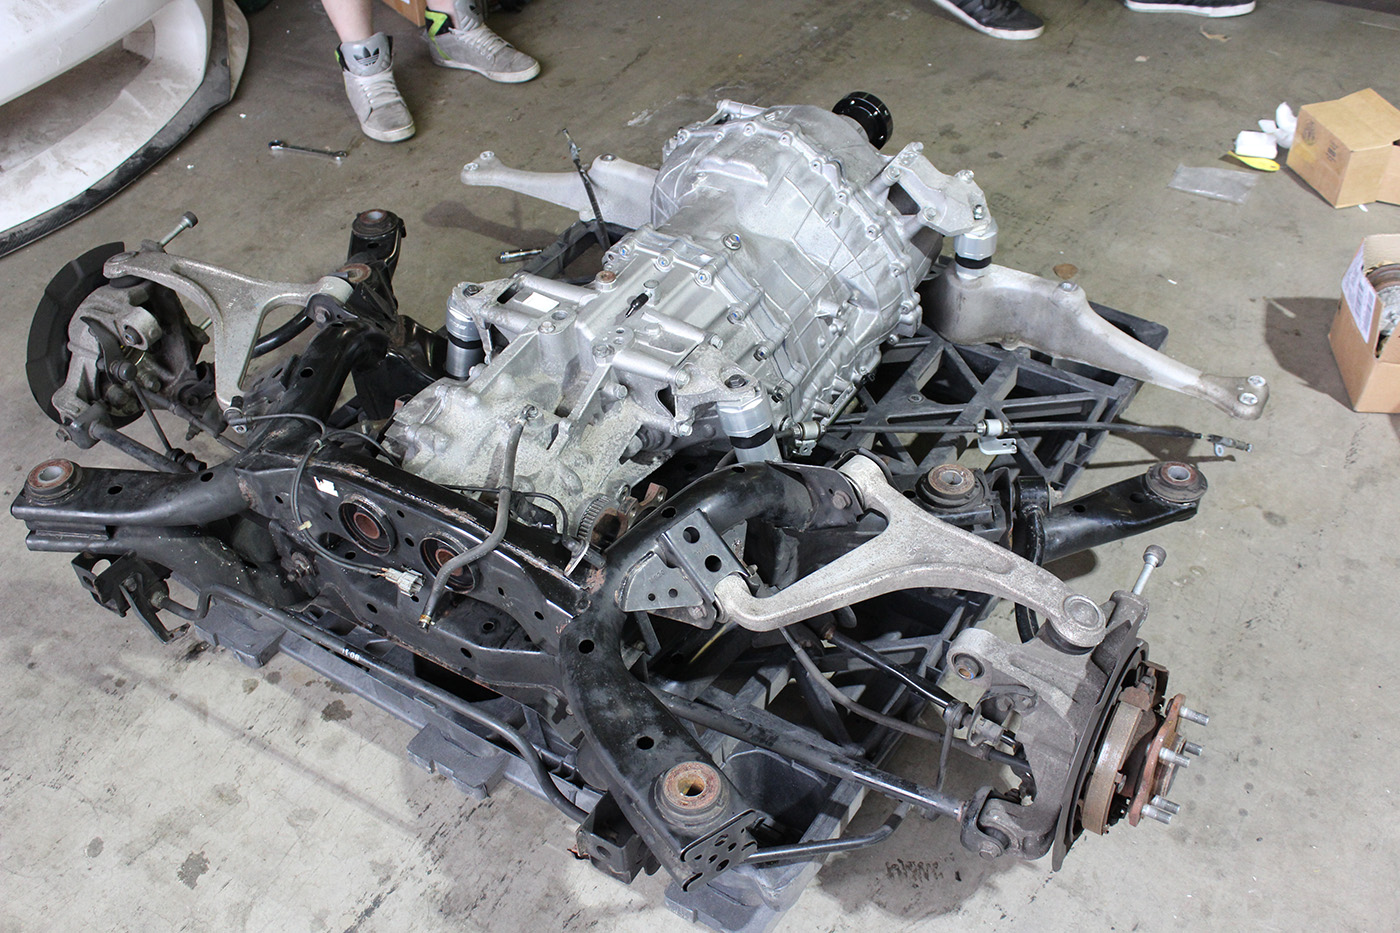
We had to pull the motor and transmission, for starters. Based on its behavior, we figured the transmission might have been trashed, and we figured it would be a good opportunity to clean things up and replace all the busted components around the engine, including the core support. You never really know what you’re going to get when you buy a car sight-unseen, but we had planned on upgrading the transmission and performing some basic mechanical work to it just to get it back on the road.

On the GT-R, the “best” way to remove the engine is to drop the entire front subframe with the engine still mounted. Nothing a few precariously-balanced transmission jacks can’t handle!


We decided to have the turbos rebuilt with some fresh seals and billet compressor wheels by Turbos Direct, so those came off for service. The shocks and springs also came off, so they could go into the trash.
We also ended up taking off the calipers so we could have them refreshed and powdercoated, as they were creatively customized by the previous owner.

Next, the transmission was removed, so we could have Sheptrans build it, and swap out the soft stock bushings for the new BDE Billet bushings. We actually did a blog post previously during this swap, check it out here. And while everything was apart, we also upgraded almost all of the suspension to fully adjustable SPL components.

Stage 3 should be enough for now, right?
On the body side of things, the rear quarter panel had to be replaced. The factory wheels were also no longer holding air, which didn’t make it fun to push around. So it rolled around on our 370Z Track Car’s wheels for a bit.

This also meant fixing some other “minor” issues, like the fuel filler neck.

There were countless brackets, support braces, and finishers that had to be replaced along the way. Even though we knew we would have aftermarket body panels covering a lot of damaged areas, it was essential to us that the car be assembled correctly before we could even hope for an extensive body kit to fit correctly. We ordered a new genuine OEM quarter panel and had Pitstop Performance replace the whole thing at the factory weld points, and they even resealed all the seams for a like-stock repair.

With the engine re-installed, we learned that the stock fuel pumps had failed, presumably from sitting in a yard for so long. We disassembled the stock twin fuel pump assembly and tested it out of the tank, and found the flow rate roughly equal to a poorly maintained drinking fountain.

We replaced those with a pair of Deatschwerks pumps and happily, it fired right up! It was just a bit on the loud side, as it had no exhaust other than the HKS Downpipes.
A few weeks later, HKS delivered the remaining full exhaust system. Frankly, it’s not much quieter now.

Since the stock suspension was trashed, we also installed a complete Air Lift Performance Suspension System with the 3H Controller. It rides great and it’s super easy to adjust with the handheld controller (which, admittedly, still needs a permanent home in our interior).
About half way through October, things were starting to get close. We had received the Aimgain Japan V2 Widebody kit, and scheduled installation with Elite Auto. The Kranze wheels had arrived but didn’t have tires, and we still hadn’t received the hood. The clock was ticking while the car still looking largely like an incomplete project. But after receiving and installing the rear bumper, the car was ready for the body kit to go on. So the GT-R was loaded up (still on 370Z rollers) and sent off to Elite…

…Where that brand new Nissan quarter panel was promptly chopped up…

…And the Aimgain panels were fitted, adjusted, and installed.

With the powertrain mostly reassembled and clock getting closer to SEMA time, we needed to make this thing at least be able to move under its own power. Next came the initial setup for the transmission, which meant flashing the TCM, raising the car on the lift, and running through all of the gears multiple times with the wheels free-spinning, then topping off the transmission fluid. At 9pm with no headlights installed, we nervously rolled the car around the parking lot under its own power, hoping nothing would break or catch on fire!
By this time, we had the car back from Elite for the body kit install, and were continuing to just put it back together mechanically. The Aimgain V2 kit makes some minor tweaks to the V1, specifically to match the updated hood and bumper design Nissan introduced in 2017 to bring the GT-R inline with their “V-Motion” design language.
During the period between getting the car back from Elite, and sending it off for wrapping, we test fit the “lightning bolt” headlights from the 2015 GT-R. We originally planned on putting the 2017 headlights in, but they’re so close to being identical to the 2015s that no one would be able to notice, and one side was on backorder w/ no ETA from Nissan. So, 2015 it was!

Stratton Motor Cars really came through by helping us get the vinyl wrap done at the last minute, and they helped with getting decals ready for all of the other sponsors who had contributed to the build. Our hood literally showed up on a Friday evening, and they were there on Saturday helping prep everything.


The weekend before SEMA, on that Saturday, we were all at the shop putting the long list of finishing touches on the car, as it had to be in Vegas the next morning. So that afternoon, we wired up the corner lights and installed the headlights, while SMC finished wrapping some extra panels and applying some decals.

Some of the panels needed the rubber lip seal installed, so that was taken care of. We installed the Voltex wing, and got the newly-installed 2015 tail lights working (a short in a damaged wiring harness had popped the fuse), which also solved our issue with the shifter not going into park.

By 6:30, the car was still getting some of the last panels put on, like the front splitter.

Several parts still needed modification to fit correctly. The camber settings had to be dialed in to make the fitment look just right. The air system had to be adjusted so it would sit just right. By 3am that night, the guys were on the road to Las Vegas, about a 4-5 hour drive from our location in Phoenix, AZ.
And even that wasn’t without incident. The fuel filter on the truck towing the car sprung a leak and they had to perform an emergency repair in an Autozone parking lot on the outskirts of town. The car had to be trailered with most of the widebody removed, as well as the massive wheels, as the car was just too wide to fit on the trailer otherwise. So once arriving at the Las Vegas Convention Center, they had to unload the car and reassemble it. This meant reinstalling the widebody panels, wheels, and sideskirts, in the parking lot of the LVCC.
Ray rolled the car in, and the SEMA employees flagged him down and directed him inside the building. We weren’t really told where we would be parked specifically, but were told we would be outside. So ultimately being parked right in the hall at the front entrance of the show was a pretty good feeling!
But after a year and a half of constantly racing the clock, it made it.


On a side note, we’ve developed a really good relationship with HKS over the last few months. They provided the full exhaust system on the GT-R, and it was really nice to get the car there in time for them to see, and even post on the official HKS Instagram page!


And we’re not quite done yet! After getting the car back, we got it registered and insured (which required having a Level 3 inspection done at the MVD–clock that Google Maps photo). Then we had it aligned at driving height, fixed an issue with the VDC system, and we’re having one of the panels re-wrapped as it got a little scuffed during transportation.
If you’re in the Phoenix area, you’ll probably be seeing this car running around here and there, especially at local car shows like the Pavillions and Cars & Coffee. Otherwise, keep an eye out on the blog and on social media to see more as this car continues to evolve!

That’s an A-M-A-Z-I-N-G run-down, Nick. What a fantastic project and end-product from a World Class organization. You guys never cease to amaze…!
Quick question on the build. I’m assuming you guys installed a 2017 hood but is the fascia a stock 2017 one or part of the wide body kit.
Hey Christopher, we did have to install a 2017 hood (we actually installed an N-Tune FRP Replica because the OEM one was going to take too long to come in), and the front fascia is part of the Aimgain Widebody kit. Our 2011 hood was still fine, but because the fascia follows the “V-Motion” design cues of the 2017, the hood had to match it.
Shout out to Nick from Jake
Wow, what a great project! And a super-nice write-up. I’m all about saving a good car – my 350Z is a salvage title, and thanks in part to you guys it’s now a pretty sweet ride. I need to check your blog more often!