In one of my previous posts, you saw how I installed a Walbro 485. I knew going into that installation that the Walbro pump drew more amperage than the stock pump. What I didn’t realize was just how quickly it would wear out the OEM fuel pump control unit (FPCU).
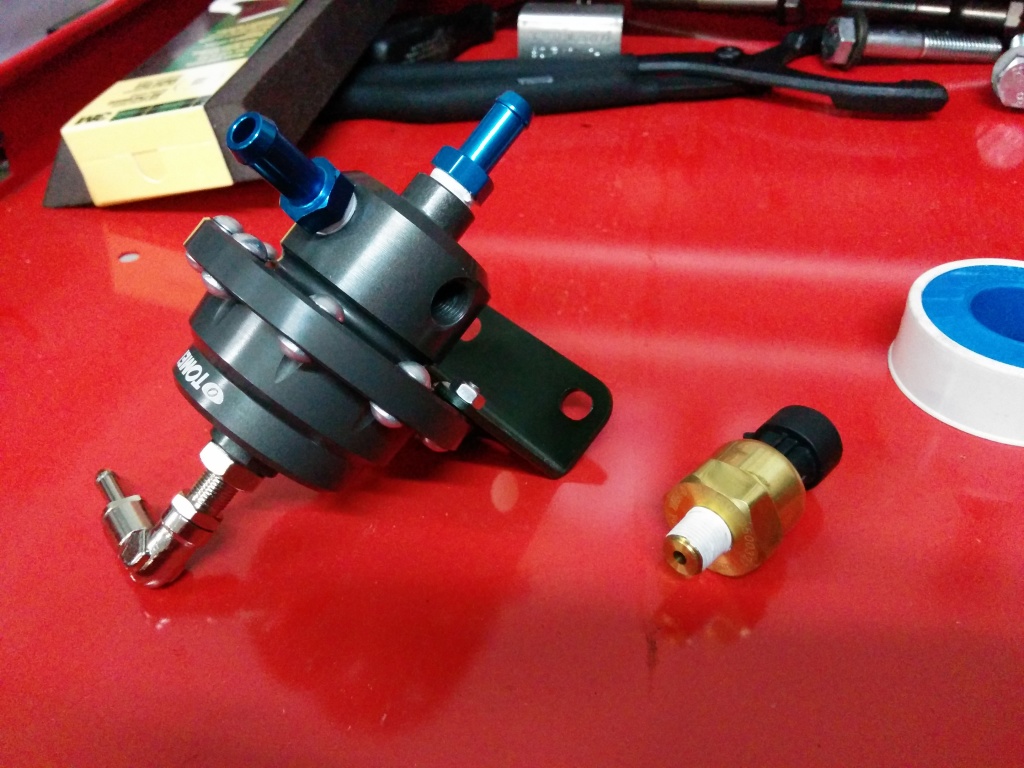
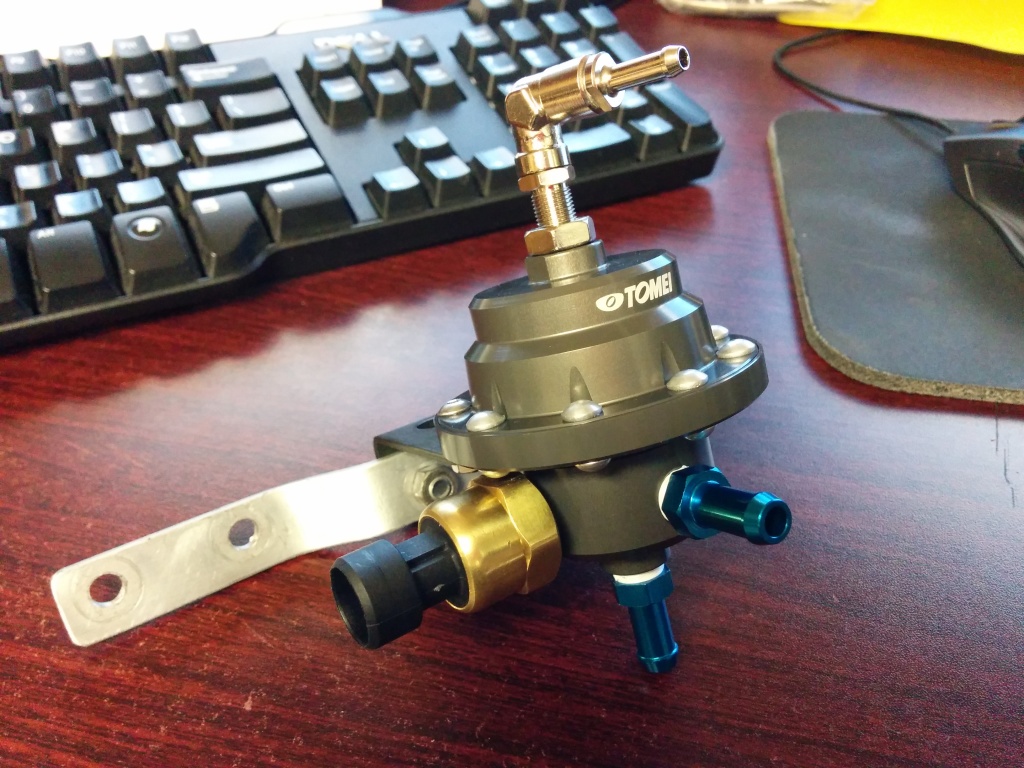
After a couple of weeks of running the new Walbro, I started leaning out at the top end slightly. At first, I attempted to compensate for it through tuning, but eventually found that I could max out the fuel injectors and it would still lean out, even at boost levels as low as 100kpa (approximately 14 PSI). Around the same time, I noticed a strange honking noise coming from the stock FPR under cold startup. I took it as a sign that the FPR was ready to be replaced, so I went ahead and installed a Tomei Type-L Adjustable Fuel Pressure Regulator. Like virtually all adjustable FPRs, the Tomei has a 1/8 PT (BSPT) for use with a fuel pressure gauge, so I also took the opportunity to add a pressure sensor for use with my GReddy Multi D/A gauge. Keep in mind you will need a pressure gauge of some sort with an adjustable FPR, else there’s no way of knowing what it’s adjusted to! Tomei, of course, recommends using their own gauge.
I also have a simple bracket that was meant for use with a smaller FPR (SARD, specifically), but most Japanese FPRs use the same style mounting bracket. It positioned the FPR just a hair too close to the clutch master for me to use, so I had to drill it out and modify it slightly, but overall it worked well.
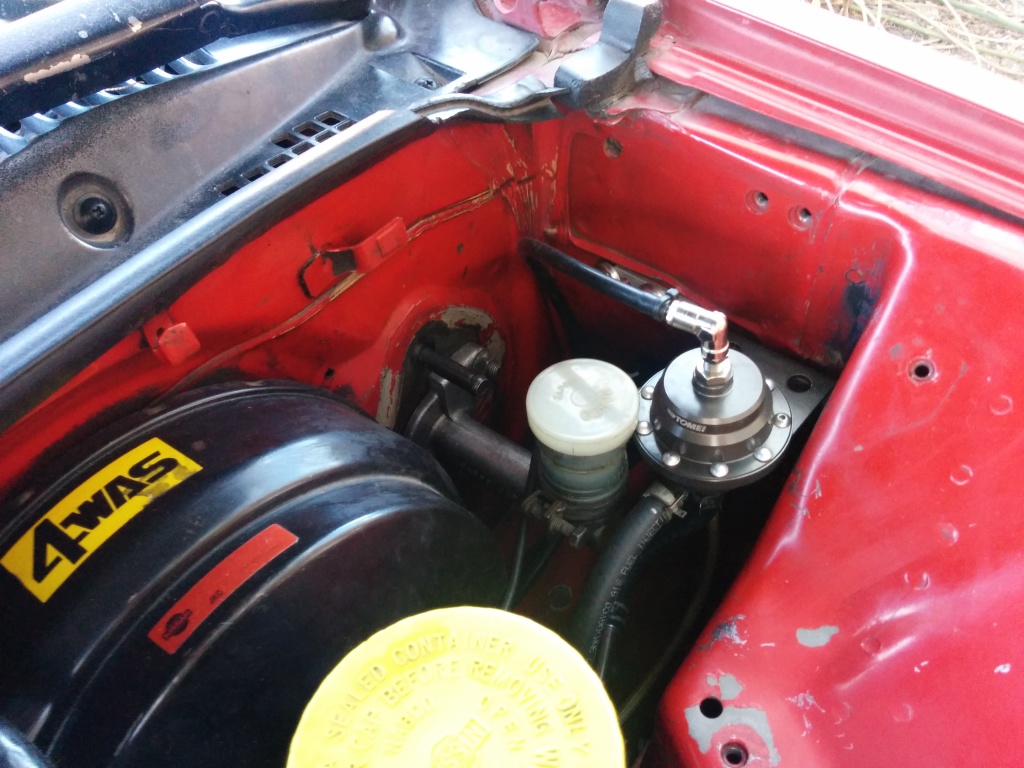
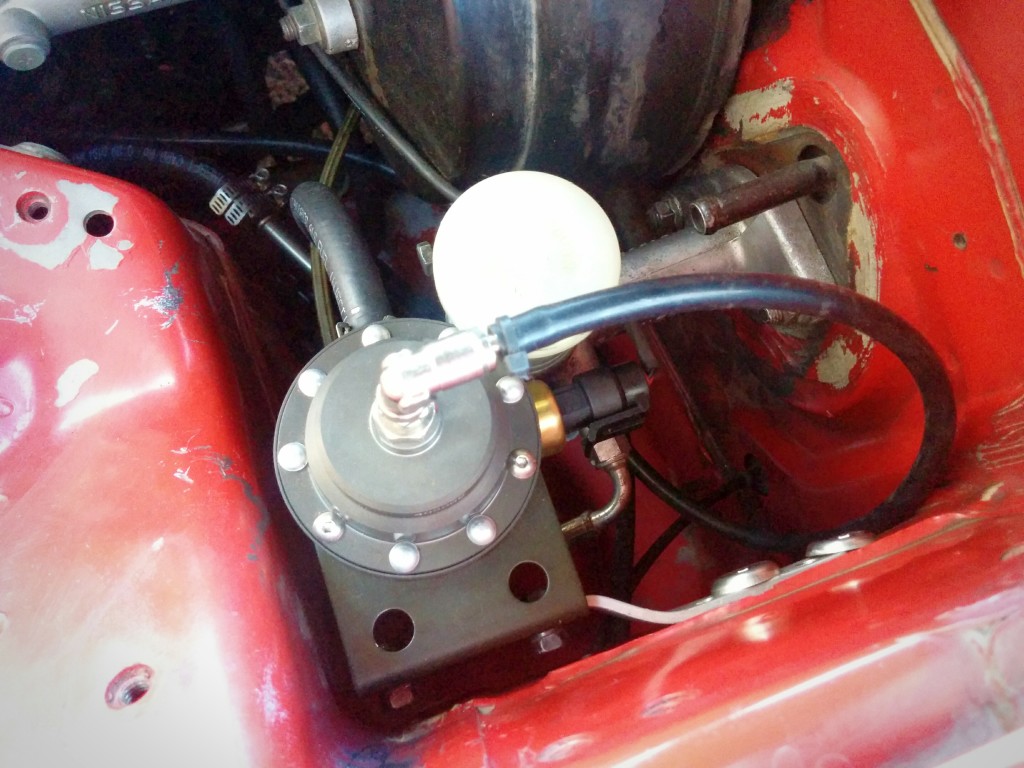
While installing, I also took the time to remove the factory fuel damper. The fuel damper is there to dampen vibrations in the fuel system, primarily caused by the fuel pump and from the injectors opening and closing. With most aftermarket FPRs, the diaphragm is large enough to help dampen vibrations by itself. This is even more true with the giant Tomei Type-L. Additionally, the primary source of vibration is caused by the stock fuel pump, which uses a traditional gerotor design, which is also what makes that distinct whining noise you can sometimes hear. The Walbro 485 switches to a turbine impeller design, which is not only significantly quieter, but also provides exceptionally smooth fluid output. Between these two changes, I felt comfortable deleting the stock fuel damper, so I did just that. Here is the FPR installed in the (not so pretty) engine bay.
In this configuration, the fuel circuit is as follows:
Fuel Tank > Pump > Filter (relocated to the rear of the car) > RH Rail > LH Rail > Tomei FPR > Ethanol Content Analyzer > Fuel Tank
Now, the point of the FPR is to regulate fuel pressure in comparison to the manifold pressure. Since this is an adjustable FPR, the next step is to adjust it.
The fuel injectors are just valves that open and close. There is pressure in the fuel system, which causes fuel to spray out the end of the injectors when they open. This happens, physically, because the pressure in the rail is higher than the pressure in the manifold, into which the fuel is spraying. It’s the difference in pressure that makes the fuel move from the fuel system to the manifold. But the pressure in the manifold is constantly changing. When you’re idling, the pressure is well below atmospheric pressure (it’s in “vacuum”), and under boost, it’s above atmospheric. So if the pressure in the fuel system never changed, the amount of fuel that came out, even for the same pulsewidth (the length of time the injector is open) would vary based on that pressure. When the manifold pressure was lower, more fuel spray out than when the manifold pressure was higher. So the point of the fuel pressure regulator is to make the fuel pressure “follow” the manifold pressure. That’s why it gets a vacuum line hooked up to it. As the manifold pressure raises, the fuel pressure must follow it in a 1:1 ratio, and the same is true when the manifold pressure is under vacuum.
From the factory, the fuel pressure in our system is 3.0 bar, or 300 kpa (43.5113213 PSI. Guess why I like metric…). This means that at atmospheric pressure, or 0 PSI of boost, the fuel pressure will be at 3 bar. So the easiest way to set the fuel pressure regulator is to disconnect the vacuum line going to it. Be sure to plug the line on the engine side. Then, loosen the adjustment lock washer (13mm on the Tomei) and turn the adjustment screw (10mm) with the car running, all while monitoring the fuel pressure gauge. Once you get it to rest at 3 bar (300 kpa), you can reconnect the vacuum line. The fuel pressure should follow the vacuum down, and where it rests will just depend on how much vacuum your engine is drawing on the manifold. My car idles at about -70 kpa, which brings the fuel pressure down to 230 kpa. Under boost, it will follow the manifold pressure up, so if you’re running 1 bar of boost (about 14 PSI), you’ll get 4 bar of fuel pressure. See why metric is fun? It’s simple math.
Anyway, after replacing the FPR and getting it all set up, I went to adjust the fuel pressure and found an immediate problem. It was all over the place!
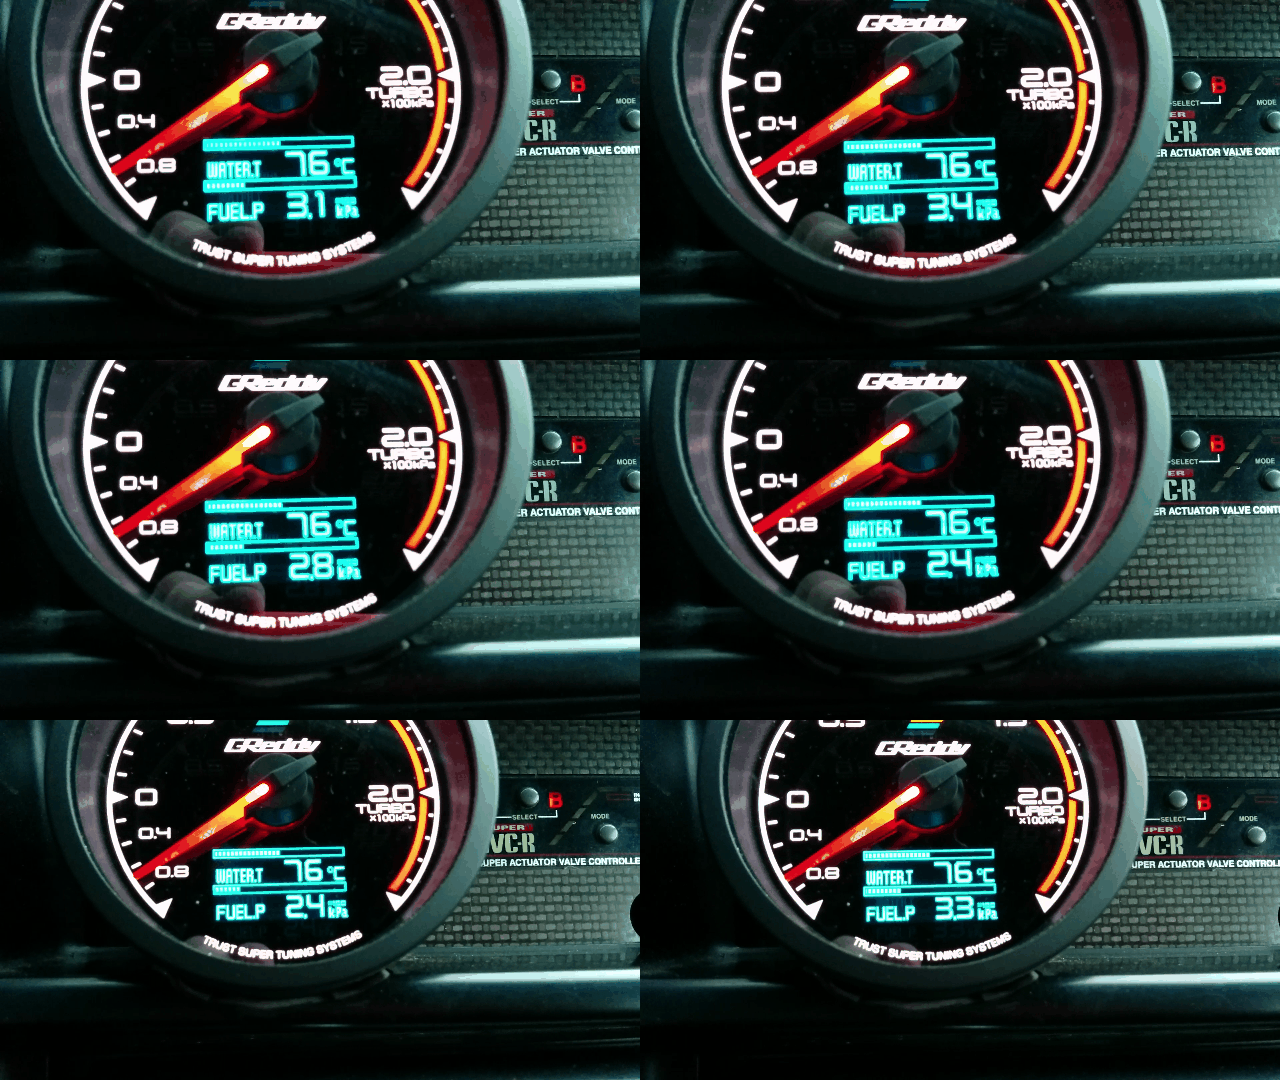
At idle you can see the pressure fluctuate between 240 kpa and 340 kpa. That’s a > 14 PSI delta with stable vacuum signal!
There was definitely something else going on. I played with the FPR’s adjustment and it really made no change, nor did disconnecting or reconnecting the vacuum signal. Moreso, the return line back to the tank had virtually no pressure felt by squeezing it, and it should have some resistance. The next thing I checked was the FPCU.
The stock FPCU is known for failing, even in a bone stock setup. Nissan revised it in ’95 for the TT, by adding a second capacitor, but the capacitor isn’t the point of failure. The transistors on the side of the unit are, and even on the new style units, they continue to fail. For the sake of testing, it’s pretty easy to bypass the FPCU to confirm that the fuel pump itself is still fine. I gave this a shot and immediately got perfect, rock-solid fuel pressure.
Bypassing the FPCU is usually done as a temporary solution to either limp home or just diagnose the FPCU as being faulty. However, Walbro says their pumps can be run at 12V full time. The problem with doing this is that at 12V and at idle, the fuel pump (even the stock fuel pump) will flow more fuel than the stock FPR can return to the tank, so the car idles way too rich.
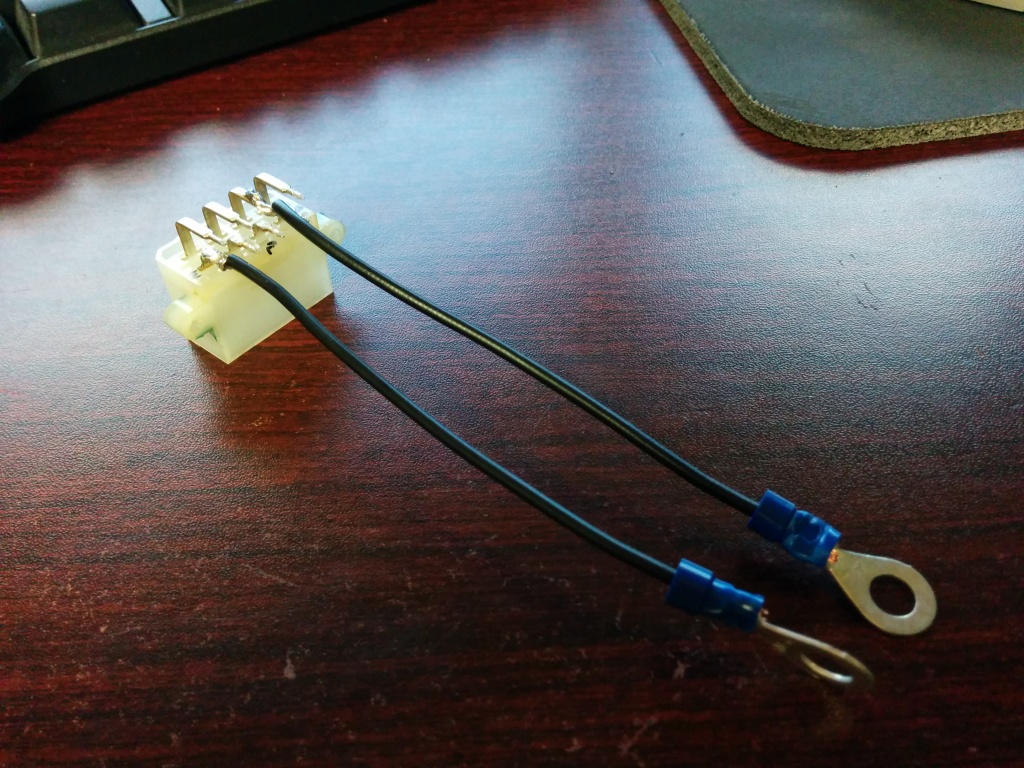
Luckily, I had just installed an adjustable fuel pressure regulator, so this was a non-issue. So I made a more permanent solution to bypassing the FPCU. The FPCU works by regulating the ground signal to the pump; the positive side sees battery voltage by default. I desoldered the 8-pin connector from a faulty FPCU I had sitting around and removed it, and soldered two wires to the pins that would normally go to the negative side on the pump (one is for a shield, and one is the primary lead). Each one got an eyelet crimped on the end.
I wrapped the exposed pins and prettied it up a bit, then installed in the car. This just required removing the FPCU and bolting those eyelets down to the chassis ground, and plugging that connector into the stock FPCU harness connector. This allowed me to remove the “jump leads” I made to temporarily bypass the FPCU at the pump, and ended with a nice, clean installation which can easily be removed and reversed without fear of something accidentally coming unplugged during use.
It worked great, so after that it was just a matter of starting the car up, setting the fuel pressure at 3 bar with no vacuum signal, and that was that. The larger FPR diaphragm and turbine-style fuel pump allow for solid, smooth fuel delivery. Idle is like butter, and I get stable, consistent fuel pressure.
Plus, I’ll be able to crank up the fuel pressure in the future and squeeze a little more out of these Nismo 740cc injectors!
UPDATE: I ended up making a new custom harness using that same connector to help keep up with the high amperage demands of the Walbro 485. Check it out here!

Just wanted you to know that I really like the write-ups. Please keep them coming. Do you have anything on dual fuel pump set-ups?
Thanks John, glad to hear you like them! I haven’t done a dual pump setup myself yet. To be honest, very few people are going to exceed the flow provided by a single Walbro 485! But I have heard it discussed, and I recently chatted with someone on TT.net who did a dual pump setup on his car, Y’d into one outlet, and a hobbs switch to allow them to operate in single or dual pump mode. Check it out:
http://www.twinturbo.net/nissan/300zx/forums/general/view/2582880/Heres-how-the-cool-kids-do-it.html
Of course, with a single Walbro 485 pretty much eating FPCUs, I’d fully expect two of them to do the same, so definitely expect to do some custom wiring.
Awesome. Would this setup work with the little walbro 342? Thanks.
Yep, you can mount it pretty much the exact same way. The only difference is the 342 doesn’t have the “donut” around the base so it will actually give you a bit more freedom in mounting.
Great, I can do the same with the regulator (its a BEGi, idk if it is good enough to remove the dampener) and FPCU as well? Thanks.
Most likely, I’m not familiar with the BEGi regulator to know for sure. The Walbro 342 is still a gerotor design like the stock pump, so you might get some fuel pressure oscillation with it at idle without a damper. But I’ve also heard of guys removing the fuel damper on a stock setup and been happy with the result, so YMMV.
Is this FPR compatible or durable with e85?
did you only use the type L so that you could delete the fuel dampener or was there another reason? i was thinking just using the type S as its a bit cheaper. would that still work fine? i will be using the same pump “Walbro 485” thanks
I used it mostly because I knew the larger diaphragm would allow me to delete the dampener, but I’m pretty sure the Type S would be able to handle it too.
awesome thanks for getting back to me! also thanks for the information!
Any pics of where you put the fuel filter? Also does the FPR eliminate the need for the FPCU ? I think mine is shot
You can pretty much put it wherever you want, even the stock location. You actually don’t need an upgraded FPR to bypass the FPCU, but if you just want to rule it out for diagnostics it’s pretty easy to bypass temporarily. Check out this link and scroll down to Byapssing:
http://z32.wikispaces.com/Fuel+Pump+Control+Unit#Bypassing
You mention:
“The stock FPCU is known for failing, even in a bone stock setup. Nissan revised it in ’95 for the TT, by adding a second capacitor, but the capacitor isn’t the point of failure”
Please point out the second capacitor added (picture ?).
I don’t have in hand 17001-40P01 unit but only 17001-40P00 (17001-30P10 superseded by 17001-30P11 too)
Hi, I really liked your post.
I wanted to ask you, I have a Z32 NA 95¨ already modified and I plan to install an FPR Afthermarket (Tomei, ETC) this more than anything to get rid of the ugly OEM Regulator and Damper. Can I follow this post to install an Afthermarket FPR?
two-. In a few months I will be installing a VG30DE + TT (Higth Compression) all in order, I already have E.C.U modified and it is working perfectly.
My question is; What do you think about installing an Aeromotive 340 LPH Stealth E85 Fuel Pump 11542?
Research and all the forums I see that they use the Walbro 255lph, I really do not plan to spend 400HP at the moment, but what do you think? Would it be better to install the Aeromotive 340lph? as they say, better than not missing? XD
Thanks for taking your time to read my questions 🙂
The Aeromotive would work just fine for what you’re doing. Considering you’re doing the other items, I’d probably still just go for the Walbro 485 so you have more room to grow, but it’s not needed for where you’re at now