Injector Testing
Fuel Injectors are a common point of failure with the Z32, at least on earlier-style injectors. If you find that you have a miss on a cylinder, a common culprit is a failing injector. There are a few tests that can be done to verify that a fuel injector is functioning properly that don't require the removal of any major components.
Contents
Ohm Testing
The most common mode of failure for Z32 fuel injectors is the internal leads running to the solenoid coils corrode and eventually create too much resistance to carry electricity at the proper rate.
This test can be done quite easily.
Tools Required
- Multimeter
- A small flathead screwdriver, wire brush, or any other suitable tool for cleaning electrical pins.
- A set of picks, tiny screwdrivers, pliers, or any other suitable tools for removing those stupid little spring clips on the electrical connectors.
Procedure
- Remove the throttle cable cover (on the center of the engine, with the "NISSAN" logo on it.
- Locate each injector connector, there's three on each side (one for each cylinder). Use dental picks, pliers, etc to remove the little metal clips holding them on.
- Note: Some discard these clips completely, though it is vital to ensure that the clips stay planted. A tiny dab of RTV on the top of the connector (NOT near the pins) will help them hold on tight if you don't wish to reuse the clips.
- Carefully clean the pins on each injector. CRC Electrical Cleaner works great, so do gun cleaning kits, small flathead screwdrivers, etc. Try to remove as much corrosion and dirt as you can. This is vital to not only this test, but the proper operation of your car, and in many cases, this alone is the cause of a dead cylinder.
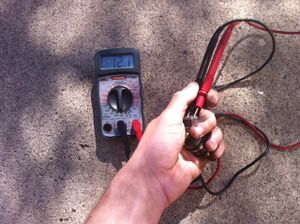
- Set your multimeter to its closest appropriate range of ohm (Ω) testing to test for 10-14 ohms. For example, if your multimeter has settings for "20", "200", and "2000," 20 would be the appropriate setting.
- Touch the two multimeter testing leads to the two pins on the fuel injector. It doesn't matter which go to which, resistance is the same in both directions.
- A good fuel injector will test between 10 and 14 ohms (Ω).If the reading is lower (not too common) or higher (very common), the injector is bad and must be replaced.
- It's vital that the pins are clean, or this reading will be skewed.
- You can touch the multimeter leads together to see if they have an inherit resistance, then subtract this value from the reading on the injector to get the true reading of the injector's resistance.
- If you get an error (I, O, Infinity, etc) it means the reading is out of range--ZERO (0) means no resistance at all, and a O (open) or Infinity (∞) indicates that there's no continuity-- the connection is completely open. The pins may be too dirty to get a reading from (stop skipping step 3, asshole!), the injector could be completely failed (broken internal connection), or failed to the point where the reading is out of range (ie your multimeter's range is set for 20 ohms, and the injector has 55 ohms of resistance). You can try turning up the range on the multimeter to verify that it's out of range, but this injector must be replaced if it truly is outside the 10-14 ohm window, anyways.
- All done! How'd you like those metal clips?
- If you're reconnecting the injector connectors (ie not replacing immediately), be sure to clean the connectors on the harness side, too.
Click Testing (CAS)
Once you've verified that all injectors are in operating range, you can verify that they click. To do this, you're going to simulate a running condition for the ECU without actually running the engine.
- Disable the fuel pump. This can be done any one of a few ways, and this article explains all the different ways.
- Note: This is a VITAL step. Not disconnecting the fuel pump will cause it to continue to run during the test, flooding the cylinders and potentially hydrolocking your engine. You cannot skip this step.
- Mark the position of the crank angle sensor in relation to its bracket. Use a few marks if necessary, it needs to go on in the exact same position.
- Loosen the bolts (3x10mm) holding the crank angle sensor to the engine. Remove the crank angle sensor, but keep its electrical connector connected.
- Turn the car's ignition to "ON." Don't try to start the car (it won't start anyways).
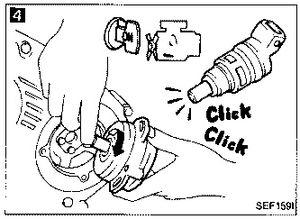
- Slowly rotate the crank angle sensor's drive shaft counter-clockwise (clockwise if it were facing the engine).
- Listen to the clicks as it rotates, you should be able to hear each injector click, one-by-one.
- Try also rotating it at different speeds, to verify that each click sounds the same.
- If one or more injectors don't click, or their click sounds significantly different from the rest, it may be clogged/stuck, or the connection between the ECU and the injector could be bad.
Testing Through the Harness
If you find that one or more injectors have a click sounding significantly different from the rest (ie the good cylinders), it could be fully or partially clogged and should be removed and cleaned or replaced. If one or more injectors don't click at all, they could also have failed, but their electrical connection should be inspected before removal.
- Disconnect the car's battery.
- Remove the passenger side floorboard, and disconnect the ECU harness connector (1x10mm).
- Refer to the wiring diagram hereto find the common positive (pin 58) and the individual injector grounds (as follows).
- FI #1 - 101
- FI #2 - 110
- FI #3 - 103
- FI #4 - 112
- FI #5 - 105
- FI #6 - 114
- Complete an ohm test between the common positive and the injector grounds, just as you would a regular ohm test. This gives you the ohm readings the ECU is seeing.
- As the wiring harness uses small holes for the pins, it may be necessary to use paperclips to connect the multimeter leads to the wiring harness pins.
- If any readings are open (infinite resistance), remove the injector connector from the injector in question and use a paperclip to bridge (short) the two terminals on the harness side of the connector. Then repeat the ohm test from the ECU-harness-side and verify that you get 0 (or VERY little) resistance.
- This should ONLY be done with the battery disconnected and the ECU harness disconnected.
- If you get high/infinite resistance on Step 5, you have a fault in your wiring harness somewhere.
Fuel Injector Replacement
See article: Fuel Injector Replacement.

