Gauge Cluster
The gauge cluster is the main collection of gauges situated directly in front of the driver, behind the steering wheel.

Contents
Gauges
On a factory Z32, the gauge cluster includes gauges indicating:
- Coolant temperature ("L" to "H")
- Speed (range and units differ my regional market)
- Boost pressure (turbo models only)
- Engine RPM (0-9000 RPM)
- Engine Oil Pressure
- Fuel Level ("E" to "F")
The gauge cluster also includes several indicator lights, changing depending on the year of the car. These include turn signal indicators, high beam indicator, and various warning lights.
Inaccuracies
The factory gauge cluster, while necessary, is commonly considered somewhat inaccurate. Specifically:
- The coolant temperature gauge essentially has three positions: cold, normal, and overheating. The needle sits in the middle for the "normal" range, which is between approx 135°F and 210°F. Should the car begin overheated, the needle will rise past the middle position and the ECU will (should) enter it's "overheating" failsafe mode, enabling the cooling fan and adjusting the idle, engine timing, and other parameters. Note that even though there is a relatively large "range" before the needle reaches the separate "H" marker, the needle should never raise beyond the middle position except under extreme driving conditions.
- The boost pressure gauge is often incorrect by 1 PSI or more, is slow to respond to pressure changes, and often doesn't report higher-than-stock boost pressure correctly.
- The numbers on the oil pressure gauge are estimations at best, and the oil pressure sending unit is common to clog/fail. There is also an O-ring on the oil tree that frequently fails, allowing oil to enter the engine without going through the oil pressure sending unit, indicating low oil pressure.
- The tachometer can be incorrect by a few hundred RPM.
For these reasons, many owners install aftermarket gauges. The most common are boost pressure, water temp, and oil pressure as they tend to be the most vague or inaccurate on the stock gauge cluster.
Differences
This section is still being researched and organized, but here's some raw information.
- There are at least two different "layouts" for mounting gauge mounting points and printed circuit sheets that seem to correspond with airbag/non-airbag car configurations.
- These two different layouts, despite having plugs that fit, do not seem to be interchangeable.
- Printed circuit sheets have been seen in a pea-soup green (think original Gameboy screen) and a dark blue.
- These are at least two different manufacturers for gauge clusters, which may have to do with the colors/layouts as well (Thanks DVDBURNfor this information!)
- A fuel gauge with an unevenly spaced 1/4 tank tic mark indicates the cluster is manufactured by Kanto Seiki.
- A fuel gauge with evenly spaced tic marks indicates the cluster is manufactured by Yazaki Meter.
More information to come as it's discovered and learned.
Removal & Disassembly
It is sometimes necessary to remove the gauge cluster--to replace or repair gauges, odometers, etc.
This guide is copied from http://www.angelfire.com/geek/vg30dett/Cluster/Fix_Cluster.htm. Credit to Henri Le Hir for the pictures and information.
Gauge Hood
- Remove the two philips screws on the underside of the gauge hood. Remove the gauge hood.
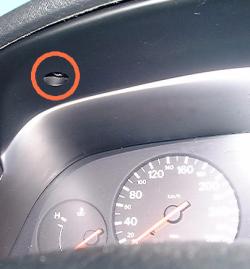
- Lift it from the front (closer to you) and gently pull towards you. It uses fragile plastic pawls to hold it in place.
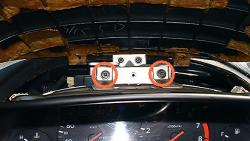
- Remove the two screws above the cluster.


Control Pods
- Remove the two philips screws on the underside of the pod.
- Slide the pod out from the bottom and unhook it from the top (it uses metal pawls on the top)
- Disconnect all connectors going to the pod.
- Remove the pod.
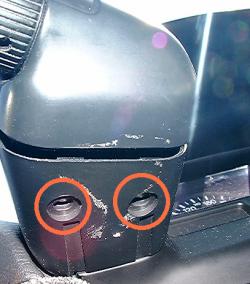
- There are two zinc-coated screws on the bottom of each pod housing that must be removed. If the upper screws are still in place, remove them as well.
- Repeat for the opposite side.
- The climate control side also has the hazard light switch. Pull straight up on the switch to remove the "cover" for it, then remove the two screws on the inside holding it in place. Be careful not to overtighten the screws when you reinstall the switch or the pods, as the screw pillars are prone to breaking.


Gauge Cluster
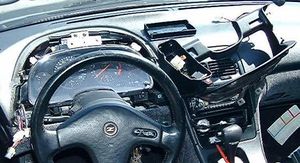
- Disconnect the connectors on either side on the top of the gauge cluster.
- Ensure that all screws are removed from the gauge trim (the black plastic in front of the cluster) and remove it. It uses snaps on the bottom to hold it to the dash, so use care when removing it.
- Remove the two screws on the bottom of the cluster, and remove those two connectors at the top from the cluster.

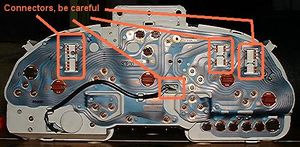
- Remove the three connectors in the back of the gauge cluster. They each have two "buttons" (one on each side) that must be pressed in to remove it. Don't force them out; doing so might damage the fragile mylar into which they're plugged.
- Remove the cluster.


Disassembly
- Remove the clear plastic shielding from the cluster. Depress each tab, and pull it forward. (This actually isn't necessary unless you want to clean it).
- Take note of the position of the fuel level. The gauge can easily be moved by accident, and should be returned to its "current" position before reinstallation, otherwise your fuel gauge will be inaccurate.
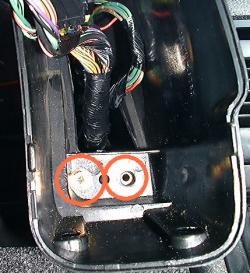
- Remove these two innocuous-looking screws. They actually hold the gauge cluster together.
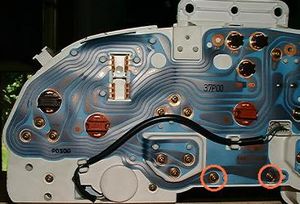
- Depress the black plastic tabs around the gauge cluster and gently separate the two halves.
- Do what it is you need to do! Reinstallation is the reversal of the removal.

As this article deals with the gauge cluster itself, we won't go into detail about repairing or replacing gauges here. The original article details how to repair your odometer: http://www.angelfire.com/geek/vg30dett/Cluster/Fix_Cluster.htm