Fuel Pump
A fuel pump is a device that siphons fuel from the tank and sends it to the engine. In carbuerted vehicles, fuel pumps are often mechanical and mounted to the engine. In modern fuel-injected cars, fuel pumps are almost always mounted directly on the fuel tank.The fuel pump is controlled by the Fuel Pump Control Unit.

Contents
On the Z32
|
|
|


The Z32's fuel pump is an electric type mounted inside the fuel tank. The actual assembly also includes a float meter (for the low fuel warning light) and various pipes and strainers to allow unused fuel to return to the tank, as well as excess vapors to bleed out.
The stock fuel pump is very strong, and the TT version can be used in vehicles producing upwards of 700 HP. While an NA pump is usually strong enough for a conversion running stock boost levels, it is strongly recommended (and considered commonplace) to upgrade the fuel pump to a TT unit.
Versions
There are four different fuel pump configurations for the Z32.
| NA 2-seater |
TT 2-seater |
| NA 2+2 |
TT 2+2 |
The fuel pump assembly
(shown above) is quite different between 2+2s and 2-seaters. While the fuel pump itself (shown at the top of this page) is the same basic shape between across all units. When installing a 2-seater pump into a 2+2 (for example, during a twin turbo swap), it is necessary to also swap the strainer sock.

Swapping 2+2 and 2-seater Strainer Socks
Images thanks to lifeisboost from 300ZXclub.com.
- Remove the circular metal clip securing the strainer to the fuel pump. Try not to damage the metal clip so it can be re-used, and definitely don't damage the plastic peg to which it's mounted.
- Carefully remove the plastic strainer mount from the fuel pump.
- Press the new sock mount straight onto the new fuel pump. Be careful not to bend or damage any of the plastic pegs.
- Re-install the metal clip onto the plastic peg. Be careful not to damage the peg or the clip!


After swapping the socks, the new pump can be re-installed into the assembly.
Identifying (NA vs TT)
The NA and TT fuel pumps look the same from the outside. 2+2s (which were all NA in North America) have a sock coming right off the pump, but this can (and often is) swapped to a TT pump as part of a TT swap. Factory 2+2 TTs would also throw off this method of identification.
Fuel pumps can be recognizes as NA or TT by removing them from their mount and cutting the rubber sleeve that surrounds them.
Images and info courtesy of Z1 Motorsports.

All Z32 fuel pumps are stamped "A42-621", however TT pumps are also stamped "B71" or "B78".

And NA pumps have the stamp "B67"

After identifying, you can re-wrap the rubber and reinstall the clamp. The pump will continue to operate normally, despite having the rubber cut.
Inoperation Diagnostics
Sometimes, the fuel pump flat-out dies. It will usually begin to make a loud audible buzzing noise before it does. Finally, the car will start on cold starts and die almost immediately after--this is because the failing fuel pump was able to prime the fuel system on the last driving session, but doesn't immediately begin running on the cold start.
When the fuel pump is inoperative, there are several items that should be checked before concluding that the fuel pump itself has failed. Be sure to perform these steps in order.
Verifying Inoperation
The first thing that should be done is to check to see if the fuel pump is running, or if your starting problem is elsewhere.
- Gain access to the fuel pump itself.
- On a 2+0, this is done by removing the parcel tray directly behind the seats.
- Remove the two plastic covers on either side of the tray by pulling straight up from the inner-side.
- Remove the screws under the carpet.
- Remove the parcel tray.
- On a 2+2, this is done by removing the rear spare tire & cover.
- Remove the rear carpet.
- Remove the spare tire.
- On a 2+0, this is done by removing the parcel tray directly behind the seats.
- Place one hand over the fuel pump cover (left cover on the 2-seater).
- Crank the engine (attempt to start). You'll need a helper if you have a 2+2 unless you have freakishly long arms. You should feel a clear buzzing coming from the cover. If not, read on to figure out why the fuel pump is running.


If you can't feel/hear the fuel pump running, continue reading to figure out why it's not turning on.
Run Codes & CAS
The first thing you should do is run codes to see if the ECU detects any faults in the electrical system. Specifically, code 11 (CAS circuit) will prevent fuel pump operation, as the ECU waits to receive the 1° signal before sending power to the fuel pump.
Now is a good time, even if the ECU doesn't throw code 11, to check operation of the CAS.
- Relieve fuel pressure.
- If your car isn't starting, this probably isn't necessary, but it should still be done in case you're chasing a red herring.
- Mark the position of the crank angle sensor in relation to its bracket. Use a few marks if necessary, it needs to go on in the exact same position.
- Loosen the bolts (3x10mm) holding the crank angle sensor to the engine. Remove the crank angle sensor, but keep its electrical connector connected.
- Turn the car's ignition to "ON." Don't try to start the car (it won't start anyways).
- Slowly rotate the crank angle sensor's drive shaft counter-clockwise (clockwise if it were facing the engine).
- Listen to the clicks as it rotates, you should be able to hear each injector click, one-by-one.
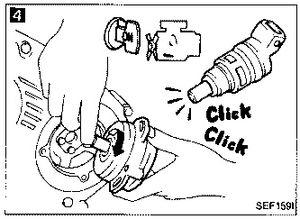
- When you're all done, re-install the CAS taking note of it's alignment pin on the cam. It only goes on one way.
- Align the CAS to the marking you set earlier and tighten the bolts down.

If you don't hear any clicking, check the harness connector to the CAS for dirty/broken/corroded pins. It could also mean the CAS is bad, as unlikely as this is.
Fusible Link
- Remove the plastic cover by the battery.
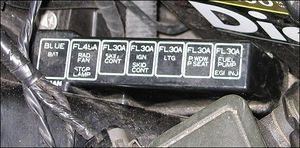
- Inspect the fusible link labeled "FUEL PUMP; EGI INJ" on the far right. If it appears burnt or broken, it should be replaced. If it looks fine, move on to the next section.

Fuel Pump Relay
Images from dr_rabias from 300ZXClub.
- Remove the driver's side door sills (4 x philips head screws).
- Remove the driver's side kick panel (the plastic panel that houses the dead pedal).
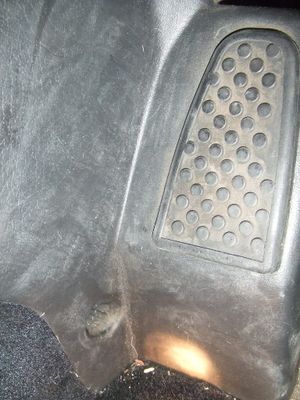
- Place your hand on the green relay.

- Crank the engine (attempt to start). When you begin cranking (and sometimes upon initially turning the key to "ON") you should feel the relay click once. When you stop cranking, you should hear it click again.
- If the relay does not click, replace it.


Fuel Pump Control Unit
Main Article: Fuel Pump Control Unit.
The FPCU can be bypassed to test its function. The bypass should be done as a temporary solution and/or for diagnostic purposes; driving the car with the FPCU bypassed could lead to failure of the fuel pump itself.
If the fuel pump does not operate after bypassing the FPCU, and all of the above tests show their respective components functioning, but the fuel pump still isn't operating, then and only then should the fuel pump be replaced.