Clutch Pedal Adjustment
When upgrading to a grippier clutch, it becomes necessary to adjust the pedal. This is because a heavier pressure plate requires more leverage to create enough hydraulic pressure to actuate. Adjustment of the clutch pedal allows it to compensate for the extra required leverage.
Pictures and info are courtesy of Specialty Z, and Thrillhouse of TT.net.
Tools Required
- A 14mm wrench (two recommended for TTs)
- A 12mm wrench (for NAs)
- Needlenose Pliers to help disconnect electrical connectors
Procedure
- Remove the dash finisher to gain easy access/view to the clutch pedal assembly. This is the plastic piece that sandwiches between the dashboard and the door panel when the door is closed.
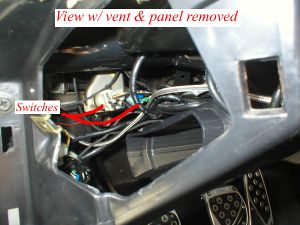
- If you're having trouble locating the clutch pedal adjustment, remove the lower vent duct (1 x philips screw)
- Disconnect the electrical connectors at the the top of the clutch pedal assembly (closest to the driver). These clips can be extremely difficult to remove, so take care not to damage them.
- Disconnect the electrical connector at the bottom of the clutch pedal assembly (closest to the firewall).
- Loosen the 14mm lock nuts from all three switches.
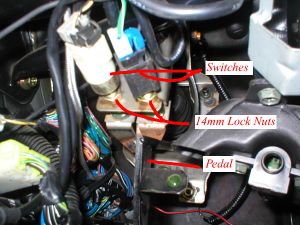
- Turn the upper two switches (by hand) until the threads just become flush with the bracket to which they're mounted. That is, they should be as far away from the clutch pedal as possibly while still allowing the pedal (once adusted) to push the switches. The pedal probably won't be able to depress the switches yet, but that's okay
- Loosen the lock nut (12mm on NAs, 14mm on TTs) on the clutch pedal rod.
- Turn the adjustment rod (14mm on TTs, by hand or with pliers on NAs) to move the pedal to the desired position.
- Ensure that the pedal comes up enough to depress the switches on the top of the assembly, but still has at least 1/16" of free play when fully released--this is necessary for fluid to return to the master, and not allowing this play will cause the clutch to slip as the fluid heats up and expands.
- Tighten the lock nut on the adjustment rod.
- Tighten the lock nuts (2 x 14mm) on the upper switches and reconnect their electrical connectors.
- Adjust the lower switch so it becomes depressed when the clutch pedal is fully depressed, but does not inhibit the pedal from moving closer to the firewall as necessary.
- Tighten the lower switch's 14mm lock nut and reconnect its electrical connector.
- Reinstall any removed interior parts (vents, trim pieces, etc).
- Enjoy!


Two Notes from Powertrix:
Attention!
If you have trouble getting the car into gear and have slipping issues from the start, please do not drive the vehicle until the pedal has been properly adjusted. You can easily destroy the clutch in a matter of a few miles. Make sure to double check the pedal adjustments whenever installing a new clutch.
Break it in!
Please break in your clutch properly. We recommend at least 200 miles of stop and go driving, w/ no slipping. You can get on it, just don't slip or try to drag launch your new clutch. Also, you may void your warranty if you improperly adjust your clutch rod and switches! Please ask us how to properly adjust your clutch....only if needed.