Fuel Injector Replacement
The two methods of replacing a failed fuel injector (or injectors) are the dremel method or the conventional method of removing the intake manifold. There are benefits and drawbacks to each method:
Contents
Dremel Method
Main Article: Dremel Method
This method consists of using a Dremel tool (or similar rotary tool) to grind away areas of the intake manifold that obscure the fuel injectors, so they can be removed without removal of the intake plenum.
Advantages:
- Often quicker and easier when replacing a single injector.
- Doesn't require replacement of intake manifold gasket.
Disadvantages:
- Metal shavings get into every nook and cranny.
- Potential for grinding too far and creating a leak in the intake manifold.
- Even after modifying the plenum, it's practically impossible to remove an old injector without completely destroying it.
Plenum Removal
Main Article: Intake Manifold Removal
The conventional method to replace fuel injectors is preceded by the removal of the intake manifold (otherwise known as the plenum, or manifold collector). As it is a somewhat lengthy process that involves removal (and reinstallation) of various vital engine components, some opt for the messier Dremel Method when replacing injectors. However, some consider the removal of the intake manifold to be the proper way to replace injectors.
Advantages:
- No mess of metal shavings.
- Easier to remove injectors from the fuel rail (as the rail can be removed easily).
- Less overall labor-intensive than the Dremel method when replacing all injectors.
- If not already completed, facilitates the removal of various related components that make future plenum removal jobs significantly easier.
- If said deletes and bypasses have already been completed, the entire job is significantly less labor intensive than the Dremel method.
- Facilitates other maintenance jobs, such as valve cover resealing, or even timing belt service (as removal of the cam gears is made easier by access to the cam itself).
Disadvantages:
- More time consuming than the Dremel method (at least, until deletes & bypasses are completed).
- Requires the replacement of the intake manifold gasket (approx. $9 USD).
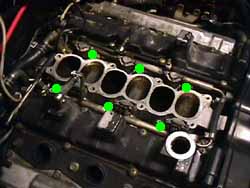
Injector Removal
After using one of the above methods to gain access to the injectors, they can be removed in one of two ways.
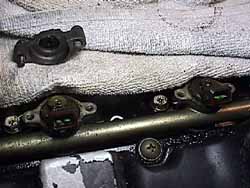
If you have removed the intake manifold, the easiest way to remove the injectors is to also remove the fuel rail and tap the injectors out from underneath.
- Remove the 6 x 10mm bolts holding the fuel rail to the lower intake manifold.
- Remove the fuel rail's ground wire from the manifold (1x10mm bolt).
- Lift both sides of the fuel rail up as one unit.
- Remove the caps securing the injector to the fuel rail (2 x philips screws). Be careful not to damage the top of the injector or lose the little washer.
- Turn the rail upside-down and support it over an opening, being careful not to obscure or damage the injectors. Use a vice with caution as it can damage the fuel rail.
- Position an 11mm deep-well socket over the injector to be removed so that the socket's opening (the "bolt-side") is touching the metal rim of the injector. Make sure it's not touching the pintle (the firing tip), and make sure the fuel rail is supported by something other than the injector(s).
- Put a towel on the opposite side of the injector (to catch the injector).
- Hit that shit with a hammer.
- ???
- Profit.


Video Demonstration
If you haven't done so before, now is a good time to replace the fuel rail insulators.
If you're unable to remove the fuel rail (ie, performing a replacement via the Dremel Method, you can instead remove the injectors from above. Do note that doing so is very likely to damage the injector.
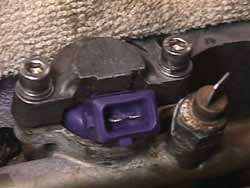
- After relieving the fuel pressure and gaining access to the fuel rail, remove the pintle caps (2 Phillips screws on each cap).
- Note: Original screws are philips head screws, and LOVE to strip easily. Be sure to use the proper sized screwdriver, and gently tap it into place with a hammer to make sure it's seated. If the screws strip, try using some locking needle-nose pliers to remove them. It's common to replace these philips screws with allen head screws, as shown above, to make replacement easier in the future.
- Note: Original screws are philips head screws, and LOVE to strip easily. Be sure to use the proper sized screwdriver, and gently tap it into place with a hammer to make sure it's seated. If the screws strip, try using some locking needle-nose pliers to remove them. It's common to replace these philips screws with allen head screws, as shown above, to make replacement easier in the future.
- Using some locking pliers, grip the tops of the injector head and twist until it freely rotates.
- While twisting, gradually pull up (away from the engine). It will likely take quite a bit of effort.


- Tip: If you soak the injector(s) in PB Blaster 24 hours in advance, it will make removal much easier.
Injector Installation
Installing new fuel injectors is a simple but delicate process that must be done with care to ensure the health of the motor.
- Install new OEM upper and lower O-Rings.
- Note: This step CANNOT BE SKIPPED. It's not one of those things where you can think "I know I should, but I don't have the time/money/patience to so I will in the future." Injector O-rings are a compression type that can only be used once, and after they've been removed, they cannot be used again. Failure to replace these o-rings will cause a fuel leak, and a fuel leak into the cylinder can (and will) hydrolock the motor, which can cause complete engine failure.
- Thoroughly lubricate the O-rings. Vaseline is a common choice, as it stays where you put it and will safely dissolve as the injector is used. Another option is motor oil, which does a great job keeping thing slippery. Avoid silicone-based lubricants (as they will deteriorate the rubber O-rings). WD-40 works, too, but is quite wet.
- Tip: It also helps to apply a little lubricant to the inside of the fuel rail.
- Insert the fuel injector straight into the rail. The connector should face away from the rail; towards the outside of the car.
- As the upper O-ring hits the fuel rail, it will give you some resistance. Gently twist the injector back and forth while gradually applying more pressure. The twisting motion will help prevent the O-rings from pinching.
- At a certain point, the injector will fully seat in the rail. This may be met with a sudden pop or just a gentle "landing" all the way in.
- Do NOT try to force the injector in. It does take a bit of effort, but use only your hands (maybe a towel for better grip)--tools are not necessary and under NO circumstances should you try to "draw in" the injector by tighting the cap screws down on top of it. This will almost definitely cause an o-ring to pinch and cause a fuel leak.
- Be careful not to damage the little peg sticking out of the top of the injector (on P1 injectors).
- Install the upper insulator (that little washer thing) around the peg sticking out of the top (P1 injectors).
- Set the cap screws in place and hand-thread them in, then tighten them down nice and snug.