Front Bumper Cover
The Front Bumper Cover, sometimes called the Front Fascia or Front Bar (to the Aussies!), is the body panel that covers the front bumper on the Z32, and forms the front of the body shape.
Contents
Versions
There are three versions of front bumpers found on Z32s from the factory (two outside the US market).
- 1990-1998 Twin Turbo

- Also used in Japan on 1997-1998 NA models.
- 1990-1996 Naturally Aspirated (No intercooler slots)
- 1999-2000 (Japan only)


OEM bumpers are made of urethane and are yellow in color if unpainted.
Removal
Thanks to Aus300ZX.com for the pictures & original writeup <3
Tools Needed
- 10mm socket & ratchet
- Assortment of extensions
- Philips screwdriver
Procedure
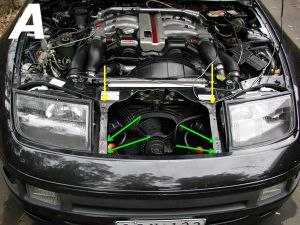
- Remove the 2 x 10mm (4 x 10mm bolts for cars with air bags) bolts securing the nose panel to the chassis. (Yellow arrows below)
- Remove the 4 x 10mm bolts securing the fascia to the chassis (Green arrows)
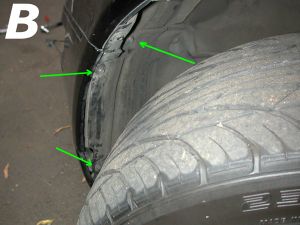
- Remove the 3 bolts securing the fender liner to the chassis and front bumper retainer (often philips screws or 10mm bolts, green arrows)
- Remove the 2 x Philips screws securing the turn signals to the front bumper. Disconnect the turn signal's harness connector and set it aside.
- Using some extensions and the access gained through the turn signal holes, remove the 2 x 10mm nuts securing the fascia to the fender (green lines below)
- Gently peel back the fender liner and remove the 2 x 10mm bolts securing the fascia to the fender (blue lines)

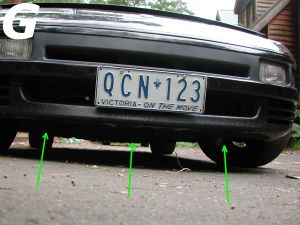
- Moving to the underside, remove the 3 x 10mm bolts securing the fascia to the corner under-shroud. Repeat for the opposite side.
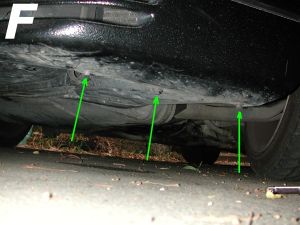
- Remove the 3 x 10mm bolts securing the fascia support bar to the center under-tray.
- Violently shake and pull at the bumper until it's removed.
- Just kidding. Be gentle and check for snags as you remove it.
- Enjoy~


