Dremel Method
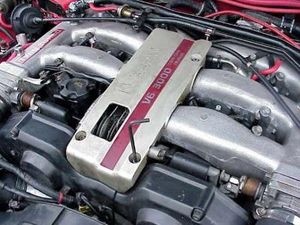
The Dremel Method (named after the main tool necessary to complete) is a method of grinding away portions of the intake manifold, allowing access to the fuel injectors and their screws in order to remove and replace said injectors.
Related Articles:
Fuel Injector
Intake Manifold Removal
This article was shamelessly plagiarized (and slightly tweaked) from robo's writeup over at twinturbo.net. The original article can be found at the following link:
http://www.twinturbo.net/nissan/300zx/forums/technical/view/970094/How-to-Replace-Fuel-Injector-Using-Dremel-Method.html
Preferred Tools
- Dremel brand rotary tool
- #225 Flex-Shaft attachment for the Dremel can be very helpful
- Tungsten carbide cutter bit #9901 or similar metal grinding bit
- Phillips screwdriver (for old screws)
- Allen wrenches, or better yet, ball-end Allen wrenches
- Two 5mm x 14-16mm x 0.8mm stainless steel Allen screws per injector
- Shop Vac
- Replacement injector (duh!) and O-rings
- PB Blaster, WD-40, Vaseline
- Light source
Time needed: About two hours, not counting the time taken to soak the old screws in PB Blaster over night to make their removal easier.
Difficulty: 2.5 out of 5. Requires a little finesse.
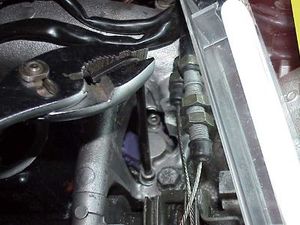
- Use a 5mm Allen wrench to remove the four cap screws that hold the throttle cover to the plenum.
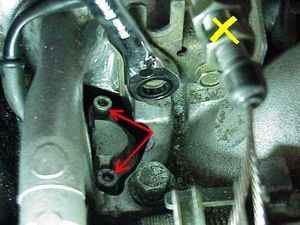
- For injector number one, loosen and set aside the throttle and cruise control cables (yellow X), and the throttle bracket. Red arrows are pointing to the two Allen screws that hold in injector number one. Gear wrench is on the throttle bracket. Remove the oil filler cap and stuff a rag into it.
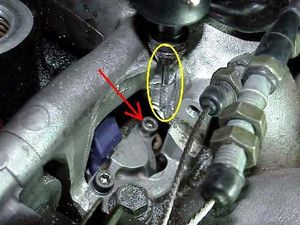
- Grind away the plenum with the Dremel so that the cab screw by the red arrow will come out.
- Use a Shop-Vac and a helper to suck the metal filings out as you grind. Disclaimer: You'll be able to get 50% of the shavings at best.
- Get straight over the top of the injector and look down between grindings to ensure you have a straight shot at it.
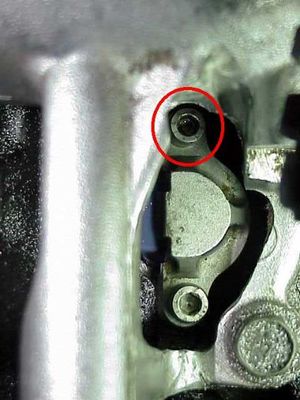
- Remove the screw on the non-Dremel'd side first for a little more "fudge" room with the remaining screw.
- Note: the original screws are philips heads. Use a PROPERLY SIZED philips head screwdriver and gently tap it into the screw with a hammer to ensure it's seated all the way before trying to turn. They are a PAIN to remove if the screw strips.
- Cap screws are out, half-moon cover is off. I soaked the injector for 24 hours in PB Blaster at this point before even trying to remove it.
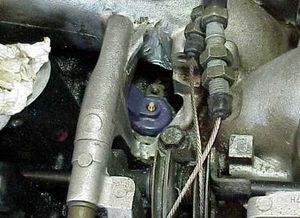
- This is how I grabbed the injector for both removal AND insertion. However, upon insertion, I padded the pliers with a rag. Twist the injector back and forth first before trying to pull it out, to beak the seal. Mine came out easily but these injectors had already been replaced once. Expect original injectors to be tougher.

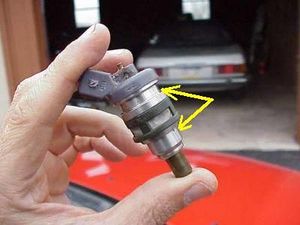
- There are two O-rings and a half-moon little rubber gasket that go with each injector.
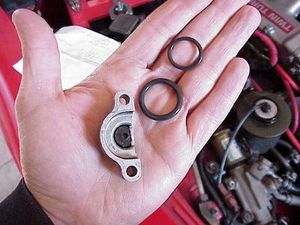
- I coat the O-rings with Vaseline and squirt a little WD-40 into the fuel rail where the injector sits. The yellow arrows show where the O-rings go.
- A small amount of motor oil works well, too. Avoid silicone spray as silicone tends to deteriorate rubber.


- There is also a rubber insulator that goes between the fuel rail and lower intake manifold, but its replacement requires the removal of the fuel rail, which requires the removal of the intake manifold.
- Be sure not to draw the injector into its place with the cap. It should "pop" into place and seat fully without needing to hold it down.
- If the injector doesn't seat by twisting and pushing, forcing it could pinch and O-ring and lead to a fuel leak.